Glue Pot

I’m a fan of hot hide glue for musical instrument work. There’s no need to rehash the pros and cons of HHG versus liquid hide glue and modern synthetic glues like PVA; suffice it to say that it has been used successfully for millennia and I think there are very good reasons to continue using it for certain things including high-quality instruments.

To use HHG, you first dissolve it in water to make a gel, then heat it to about 60C (140F) to melt it. Too cold and the open time is reduced; too hot and it ‘cooks’, compromising the strength of the glue joint. Traditionally cast iron or brass double-boilers were used on a stove, an alcohol burner, or a charcoal brazier. Around the turn of the previous century somebody invented an electric glue pot, which used a thermostat and a heating element to maintain the correct temperature with much less fuss and risk of overheating the glue.

I know of two manufacturers still making electric glue pots. Hold Heet in the USA makes fairly large pots that are probably best suited for antique and reproduction furniture work. Herdim in Germany make smaller pots that seem to be targeted mainly at luthiers. From my research it seems that the Hold Heet pots are expensive in the US and very expensive in Europe, while the Herdim pots are expensive in Europe and very expensive in the US. Second hand electric glue pots of either brand never seem to come up on eBay in the UK, and it wouldn’t have made financial sense to import a used Hold Heet from the US and buy a 240V-110V transformer to power it. I strongly considered buying a new Herdim, and if money was no object that’s probably what I would have done.

If you search Google for alternatives to commercial electric glue pots, people have made them from various kinds of electric coffee pots, baby bottle warmers, old cast iron glue pots on electric hotplates, etc.

My new one is made from a mini deep fat fryer (0.5 litre oil capacity). I wasn’t happy with its built-in mechanical thermostat (it had about 15C of hysteresis and would probably have needed frequent adjustment), so I have instead hooked it up to a cheap Chinese PID temperature controller (a Rex C100 clone) with solid state relay output. This works remarkably well, regulating the temperature of the water bath to within a degree of the set temperature by pulsing a little bit of power into the heating element about once a second. I found I needed to set the water bath temperature several degrees higher than the desired glue temperature.

gluepot

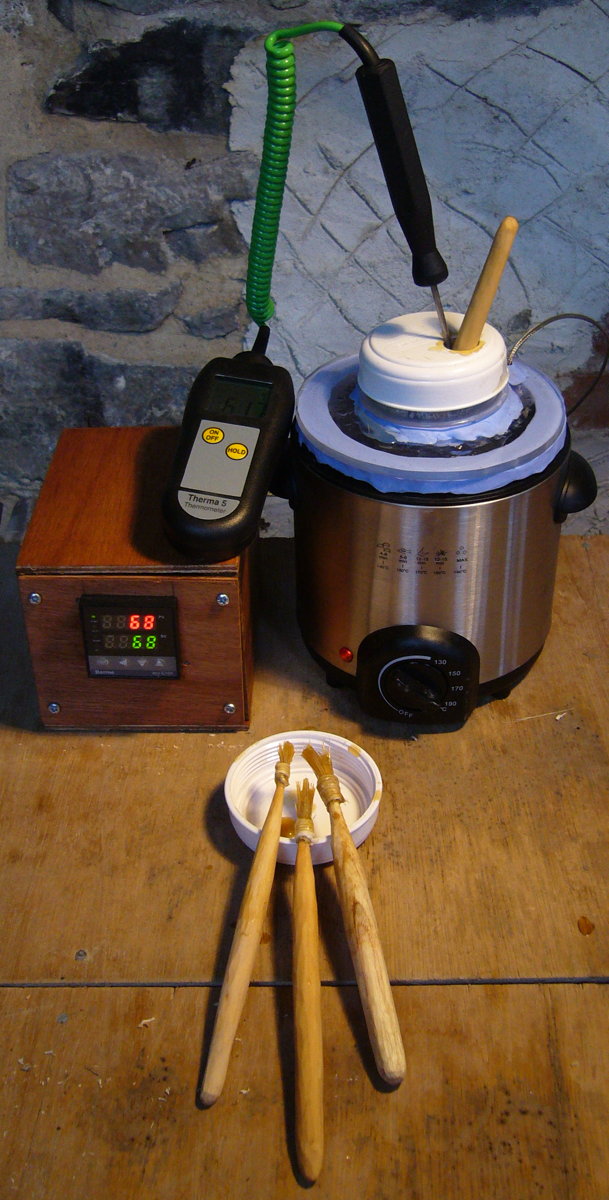
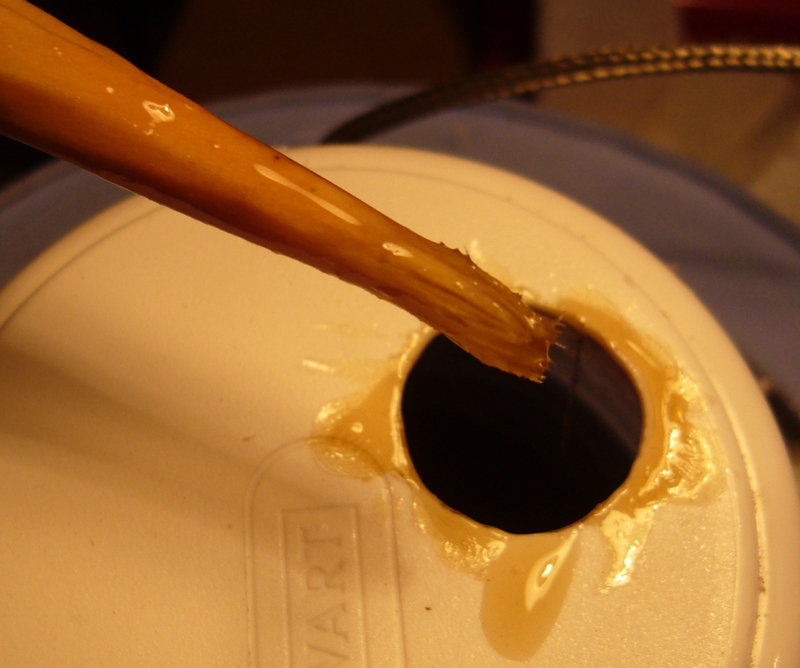
I knocked together a simple wooden box to hold the controller and the SSR, and a Perspex cover to hold the inner pot in position and prevent the water in the outer bath evaporating away. The light blue gaskets are made from two-part mouldable silicone rubber. The inner pot is a 0.25 litre Stewart Sealfresh screw-top food container. I have several of them and I cut a brush-sized hole in one of the lids to reduce the rate at which water evaporates from the glue in the pot.

I also made several glue brushes in various sizes by whittling the handles from green wood and binding hog bristles to them with string. The smallest brush I made by boiling the end of the stick in water for five minutes, then smashing the fibres apart with a hammer:

mashed_brush

mashed_brush_2


Lie Nielsen 101 Plane

It was my birthday recently, plus I had just been paid for one of my first commissions since I started Holden Concertinas, so I decided to treat myself to something a bit special. A new, high-quality hand tool that will be useful throughout my career as a concertina maker. After a lot of thought I settled on the Lie Nielsen 101 block plane.

It is very loosely based on the Stanley 101, which was apparently originally intended as a child’s toy but proved popular with modelmakers and was widely copied by other manufacturers. It features several improvements that elevate it to the level of a professional tool: a heavy, accurately machined, cast bronze body, fine screw adjustment for depth of cut, and a thick blade made from A2 steel. I normally prefer to save money by buying vintage tools and refurbishing them, but I think this is one case where the modern version really is a lot better (though if I’d had the option, I’d probably have chosen an O1 blade rather than A2 because it takes a slightly finer edge and is easier to sharpen).
lie_nielsen_101_planeLie Nielsen advertise it as a violin maker’s plane, though I don’t think there is anything about it that makes it especially well-suited for the tasks involved in violin-making. It’s really just a very small, well made block plane. I can see it being useful for many kinds of small-scale woodworking: model boats, doll’s houses, jewellery boxes, musical instruments, etc.

My one complaint with it is that the blade was dull out of the box. The back and bevel appeared to have been surface-ground and perhaps quickly swiped across a medium grit diamond stone. The surface finish was relatively rough and unpolished, and there was a slight burr at the edge. It would cut if you forced it through the wood but it wasn’t a nice experience. I know people have different standards with regards to tool sharpness and my standards are fairly high, but I wonder how many hand-tool beginners buy a high-end tool like this with the expectation that it is going to work really well straight away. They will have a disappointing first experience of the product because it is basically horrible to use until you have learned how to sharpen the blade. Particularly since the instruction leaflet claims, “The blade comes ready to use. Slight additional honing will increase performance.” Really. It’s a bit like a high-end car maker like Mercedes selling a new car with an empty petrol tank and claiming, “The vehicle comes ready to use. The addition of fuel will increase performance.”

There is an interesting parallel between Lie Nielsen’s business model and my own. Most of LN’s tools are basically copies of vintage tools invented by Stanley and others with slight improvements to the design, improved materials, and modern manufacturing methods. The tools aren’t cheap but they are well-made (apart from the dull blade thing) and highly desirable, and as a result their business seems to be very successful.


Little Coffin Plane

Lately I’ve been adding to my collection of hand planes (I’m intending to mostly use traditional hand tools to produce the wooden parts of my concertinas). I picked up a cute little antique wooden coffin plane for a few quid in a junk shop this weekend. It’s a bevel-down smoother but it’s small and light enough to comfortably use in one hand. Here it is next to my Stanley no. 4 for comparison:

little_coffin_plane_1

I lapped the sole flat using fine sandpaper on a sheet of glass. In this photo from half-way through the process you can see how they tend to wear most in the area in front of the mouth because of the way the wood you are planing is constantly being lifted by the splitting action of the blade. If this area of the sole is too concave you get excessive tear-out in the workpiece.

little_coffin_plane_2

The back of the blade was very rough, probably hand forged by a local blacksmith from a piece of scrap tool steel. It seems nicely tempered though – it took a fine edge and didn’t show any damage after hitting a few hard knots with it.little_coffin_plane_3

It took me a couple of hours of tedious hand lapping on a coarse oilstone followed by running up through the grits to a fine polish to get the back to a decent condition. I ended up giving it a slight amount (a degree or two) of back-bevel to get rid of the deep pitting near the edge without removing metal from the entire length of the blade.little_coffin_plane_4

After sharpening and polishing the bevel and a coat of beeswax on the wood, it sizzled nicely through a piece of scrap pine, shooting nice curly shavings out of the mouth.little_coffin_plane_5If it has a flaw, it’s that it has a fairly thin blade and no cap iron, so the blade has a bit more flex than I’m used to, which means it doesn’t do very well on end grain and it has a tendency to dig in and stall when you hit a knot.

More Earrings

I’ve been commissioned to make another couple of pairs of the hexagonal English earrings. Here are some photos from this afternoon’s work drilling and cutting.

I’m still drilling manually using the Taig mill. I used a 1.2mm bit for the button holes, a 0.9mm bit for most of the piercings, and a 0.7mm bit for the tiniest piercings. All re-sharpened PCB drilling solid carbide bits, and for a change I didn’t break any!

earring_making_1

Lots of silver swarf. Unfortunately it’s not very practical to collect it, though I do keep the scrap from the piercings. One day I may have enough to melt down and cast them into something useful!earring_making_2

The saw blade has to be unclamped and threaded into each piercing in turn. The teeth are too fine to easily see so you have to figure out which way to put it in the frame by running your finger along it. The wing nut is used to set the tension.earring_making_3

In this picture you can see my new bench peg clamped to the crossbar of a builder’s trestle stand. I like to work standing up with the saw table quite high so that I can get my eyes close to the template without needing to bend over, which would hurt my back after a while.earring_making_4

After a lot of frustration with paper templates that inevitably came unstuck or became illegible, I think I’ve finally found a template material that works reasonably well for very fine metal piercing: inkjet-printable matte white self-adhesive vinyl film. It’s not cheap but then you don’t need much of it for a pair of earrings, and if it enables me to produce a better end product with fewer headaches then it was well worth it!earring_making_5

Thanks to Juliet for the photos of me working. 🙂