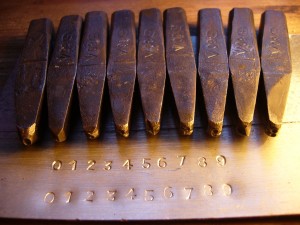
My best friend, Juliet, gave me a set of New Old Stock hand-cut 1/8″ number punches for Christmas. I plan to use them to stamp the serial numbers in all the instruments I make.

The astute among you may have noticed that there is no number 9 punch – that is because you are intended to use an upside-down number 6 instead! The bottom line in the photo was my first attempt, punching into soft aluminium sheet on a block of wood; the metal deformed quite a lot so I tried again on an anvil and got much better definition.
Although it is possible to buy good quality brand new number punches, I believe they are now all cut by CNC machines and they look quite different. Being something of a traditionalist, I like the fact that they were hand-made, and it’s great that she managed to find a set in perfect un-worn condition. I’ve done a bit of research into how this kind of punch was made because at some point I want to cut a punch of my maker’s mark.
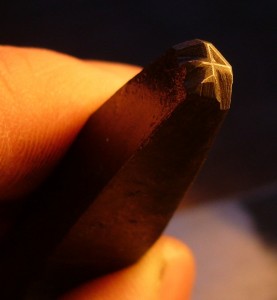
 Taking the above No. 4 as an example. First they would have annealed a small piece of high carbon tool steel bar and filed the end into a triangular pyramid shape, then hardened and tempered it and polished it smooth. This tool is known as a counterpunch and could be re-used many times (perhaps occasionally dressing it on a fine stone if the corners get a bit rounded). Sometimes one counterpunch could be used for more than one character (e.g. ‘P’ and ‘R’).
Secondly they would forge another, larger, piece of tool steel into the shape of a punch blank and anneal it, then they would file and polish the end flat, square and smooth. They may have transferred the design onto it at this point, or more likely a skilled punch-maker would have just worked by eye.
Thirdly they would use the aforementioned counterpunch to punch the counter(!), which is the enclosed triangular space.
Fourthly they would use a small triangular file to cut away the metal around the outside of the lines, leaving a very narrow rounded top edge. The angle of taper is fairly important to get right so the tool cuts sharply-defined characters but doesn’t wear out quickly. On my punches they seem to have used a coarse file to remove most of the metal at a steep angle, then switched to a very fine file at a blunter angle in the last couple of mm.
Fifthly they would coat the point of the tool in something to protect it from firescale and then they would harden and temper it. They would use differential tempering to get a hard tip and a tough hammer-resistant shaft by heating the blunt end and watching the colours run up the shaft, then quenching it when the right colour reaches the point. I’ve seen a film of somebody using a pot of molten lead to do this in a very controllable way, though of course a skilled toolmaker can produce just as good results with a coal forge.